First Servlet Example
Steps to Run Our First Servlet
The article assumes, you have JDK 5.0/6.0 and Tomcat 6.0 installed and configured in your system.
Following are the steps to create a simple servlet.
- Create a directory structure under Tomcat for your application.
- Write the servlet source code by creating java classes which will extend any Servlet(Servlet,HttpServlet etc).
- Create a deployment descriptor.
- Compile your source code.
- Run Tomcat.
- Access your Servlet application through browser
Step 1: Create a Directory Structure under Tomcat :
Go to webapps directory of Tomcat and create the following directory structure for demo application. Any directory placed with required structure of Java EE web application is treated as a web application by Tomcat.Create a folder inside webapp directory of tomcat and name it to demo.Inside demo create a folder WEB-INF and inside WEB-INF folder create a folder classes as shown below.

Step 2: Creating Servlet Class :
Create a java class TestServlet inside classes folder and add following code into this class.
import java.io.*;
import javax.servlet.*;
import javax.servlet.http.*;

public class TestServlet extends HttpServlet {
    public void doGet(HttpServletRequest request,  HttpServletResponse response)
          throws IOException, ServletException {
        response.setContentType("text/html");
        PrintWriter out = response.getWriter();
        out.println("<html><body><h1>Test Servlet </h1></body></html>");
    }

    public void doPost(HttpServletRequest request, HttpServletResponse response)
           throws IOException, ServletException {
        doGet(request, response);
    }
}
Step 3: Create Deployment Descriptor(web.xml) :
Create web.xml and make sure it is placed inside WEB-INF folder of demo application with the following content.
<?xml version="1.0" encoding="ISO-8859-1"?>
<web-app xmlns="http://java.sun.com/xml/ns/javaee"
   xmlns:xsi="http://www.w3.org/2001/XMLSchema-instance"
   xsi:schemaLocation="http://java.sun.com/xml/ns/javaee http://java.sun.com/xml/ns/javaee/web-app_2_5.xsd"
   version="2.5">
    <servlet>
      <servlet-name>TestServlet</servlet-name>
      <servlet-class>TestServlet</servlet-class>
    </servlet>
    <servlet-mapping>
        <servlet-name>TestServlet</servlet-name>
        <url-pattern>/test</url-pattern>
    </servlet-mapping>

</web-app>
Step 4: Compiling Servlet :
Go to classes directory, where .java file is placed and enter the following commands at the command prompt to compile the servlet.Before compiling the servlet set the classpath of servlet-api.jar.Servlet-api.jar contains API related to servlet like HttpServlet, HttpServletRequest etc., so it must be placed in the classpath.We can find servlet-api.jar inside tomcat-home/lib directory.
set classpath=.;c:\apachetomcat6.0\lib\servlet-api.jar
javac TestServlet.java
Step 5: Starting Tomcat and Running Servlet :
Now go to your Tomcat Directory Tomcat 6.0\bin and run the server by clicking on tomcat6.exe file.
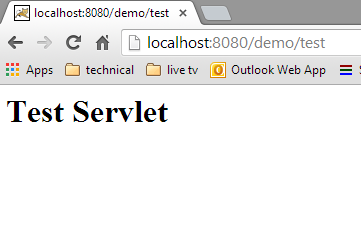
Once, tomcat is successfully started, go to browser and enter the following URL. http://localhost:8080/demo/test You will see the output as given below.

Related Articles

