Passing Parameter Using Html Form in Servlet
The parameters are the way in which a user can send information to the Http Server. For example, in a login screen, we need to send to the server, the user and the password so that it validates them.
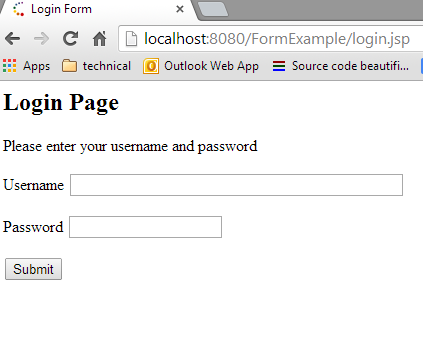
To implement this requirement we have to make one html form which will have two fields named as username and password in which user will enter username and password. And we will also have one submit button, on pressing the submit button the request will go to the server and servlet will do the corresponding validation.
In the servlet class will collect the values from login form page by using the method getParameter().The output will be displayed to you by the object of the PrintWriter class.
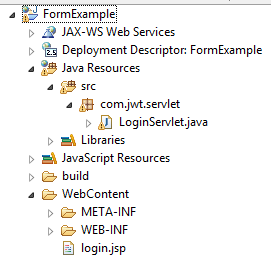
Directory Structure Of Project

The code of the program is given below:
login.jsp
<html> <head> <title>Login Form</title> </head> <body> <h2>Login Page</h2> <p>Please enter your username and password</p> <form method="GET" action="loginServlet"> <p> Username <input type="text" name="userName" size="50"> </p> <p> Password <input type="text" name="password" size="20"> </p> <p> <input type="submit" value="Submit" name="B1"> </p> </form> <p> </p> </body> </html>
LoginServlet.java
package com.jwt.servlet;

import java.io.IOException;
import java.io.PrintWriter;

import javax.servlet.ServletException;
import javax.servlet.http.HttpServlet;
import javax.servlet.http.HttpServletRequest;
import javax.servlet.http.HttpServletResponse;

public class LoginServlet extends HttpServlet {
	public void doGet(HttpServletRequest request, HttpServletResponse response)
			throws ServletException, IOException {
		response.setContentType("text/html");
		PrintWriter out = response.getWriter();
		String userName = request.getParameter("userName");
		String password = request.getParameter("password");
		out.println("<html>");
		out.println("<body>");
		out.println("Hello " + "  " + userName + "welcome to my blog");
		out.println("Your password is : " + "  " + password + "<br>");
		out.println("</body></html>");
	}
}
web.xml
Map the servlet in web.xml file
<?xml version="1.0" encoding="UTF-8"?>
<web-app xmlns:xsi="http://www.w3.org/2001/XMLSchema-instance"
	xmlns="http://java.sun.com/xml/ns/javaee" xmlns:web="http://java.sun.com/xml/ns/javaee/web-app_2_5.xsd"
	xsi:schemaLocation="http://java.sun.com/xml/ns/javaee http://java.sun.com/xml/ns/javaee/web-app_2_5.xsd"
	id="WebApp_ID" version="2.5">
	<display-name>FormExample</display-name>
	<servlet>
		<servlet-name>LoginServlet</servlet-name>
		<servlet-class>com.jwt.servlet.LoginServlet</servlet-class>
	</servlet>
	<servlet-mapping>
		<servlet-name>LoginServlet</servlet-name>
		<url-pattern>/loginServlet</url-pattern>
	</servlet-mapping>
	<welcome-file-list>
		<welcome-file>login.jsp</welcome-file>
	</welcome-file-list>
</web-app>
Note:-We need to add mysql connector jar in the lib folder of the project for getting the MYSQL DB connection using java.
Right Click on the project and select Run as -> Run on Server and select the Tomcat Server and add your project in the server and click Finish.

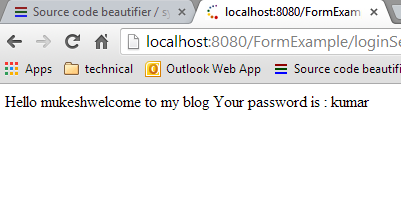
After providing the value when user clicks on Submit button user will be redirected to success page as shown below.

Download the example developed in eclipse

