Spring Security Tutorial
Introduction
Spring Security provides a full, robust,security module built for Java EE based entrprise software application.Its mostly used for the Java based web application that are build upon Spring framework. Spring security handles authentication and authorization at both web request level and at the method invocation level.
- Authentication: is a process that asks user to provide valid credentials to login to the application.For example, when the user logs into any application and gives his/her credentials, that means user authenticates himself. At the authentication level, spring supports various authentication models such as Http Basic authentication, Form Based authentication.
- Authorization: is a process of validating what roles or privileges does the logged in user has for this application based on which the user will be allowed to access the different controls or functionality in the application.For example, in a web application, there are some parts of an application where only admin have access and for some parts all the users have access. These access rules are determined by the access rights given to each user of the system. At the authorization level, spring targets three main areas: authorizing web request, authorizing whether methods can be invoked and authorizing access to individual domain object instances.
Spring Security can be integrated with Servlet API and Spring Web MVC seamlessly. The nice feature of Spring Security, when integrated with Spring MVC it will provide a default login and logout functionalities and easy configuration for authentication and authorization. Spring security Framework provides various functionalities some of them is listed below.
- Provide capabilities for login and logout
- control access to a link based on the role of the user.
- Provide the ability to hide certain portion of a page if a user does not have appropriate privileges.
- Link to a database or LDAP for authentication.
History Of Spring Security
Spring Security bagan as Acegi Security. Acegi was powerful security framework but there was a big drawback with this framework as it reuired a lot of XML configuration.A typical Acegi configuration grow to several hundred and thousands lines of XML.
With Spring version 2, Acegi security becomes Spring Security.This version brought a big changes. Spring Security 2.0 introduced a new security specific XML namspace for configuring security in Spring.
Spring Security Modules
Spring Security Module has been divided in different JARs(considered as modules).The following are the list of modules currently shipped by spring security framework. For better application prformance You should not include all the modules in your application, it depends on your requirement.
- Core(spring-security-core.jar): This is Required Module which contains the APIs for basic authentication and access-control related mechanism.
- Web(spring-security-web.jar): This module contains APIs for servlet filters and any web based authentication like access restriction for URLs. This module is required in a web application if web authentication services and URL-based access-control is required.
- Remoting(spring-security-remoting.jar): This module provides integration to the Spring Remoting. This module is optional and need to included only if you are writing a remote client applications.
- Config(spring-security-config.jar) : This module is required if you are using the Spring Security XML namespace in spring configuration.You can ignore this module If you are not using XML configurations.
- LDAP(spring-security-ldap.jar): It is required if application needs LDAP authentication or manage LDAP user entries. It provides support for authentication using the Lightweight Directory Access Protocol(LDAP).
- ACL(spring-security-acl.jar): It provides support for domain object security through access control lists(ACL's).
- CAS(spring-security-cas.jar): If you want to use Spring Security web authentication with a CAS single sign-on server.
- OpenID(spring-security-openid.jar): Used to authenticate users against an external OpenID server. It reuires OpenID4Java.
Spring Security Configuration
Follow the Steps mentioned below to configure Spring Security in your application.
Step 1. Namespace Declaration in Spring Configuration file
Spring security begins with including the security namespace declarartion in the XML file.
<beans:beans xmlns="http://www.springframework.org/schema/security"
 xmlns:beans="http://www.springframework.org/schema/beans"
 xmlns:xsi="http://www.w3.org/2001/XMLSchema-instance"
 xsi:schemaLocation="http://www.springframework.org/schema/beans
 http://www.springframework.org/schema/beans/spring-beans-3.0.xsd
 http://www.springframework.org/schema/security
 http://www.springframework.org/schema/security/spring-security-3.1.xsd">
 ...
 </beans:beans>
With the above configuration we can use "security" as the default namespace rather than "beans".
Important Point:- In general a good practise is to separate the entire sequirty specific configuration into a separate configuration file called <App-Name>-security.xml.
Step 2 . Configuring Web Deployment Descriptor (web.xml)
a) Configure DelegatingFilterProxy in web.xml
Before restricting access to users with certain privileges , there must be a way to know who is using the application. Application need to authenticate the user, prompting them to log in and identify themselves.
Spring Security supports many forms of request level security. To use web security in Spring, the servlet filters that provide various seurity features need to be setup.
In order to enable spring security for your web application, you have to add below filter declaration in your web.xml.The responsibility of the Spring Security Filter is to intercept some URL patterns in order to apply authentication and authorization as configured in the Spring security configuration file.
<filter>
 <filter-name>springSecurityFilterChain</filter-name>
 <filter-class>org.springframework.web.filter.DelegatingFilterProxy</filter-class>
 </filter>
<filter-mapping>
 <filter-name>springSecurityFilterChain</filter-name>
 <url-pattern>/*</url-pattern>
 </filter-mapping>
DelegatingFilterProxy is a Spring Framework class which delegates to a filter implementation which is defined as a Spring bean in your application context.In this case, the bean is named "springSecurityFilterChain", which is an internal infrastructure bean created by the namespace to handle web security. All request now will go through "springSecurityFilterChain" filter which will apply app security.
b) Add security configuration file in context config location setting
As I mentioned in the first step "a good practise is to separate the entire sequirty specific configuration into a separate configuration file called <App-Name>-security.xml".Do not forget to put security configuration file in context config location setting as given below.
<context-param>
    <param-name>contextConfigLocation</param-name>
    <param-value>
        /WEB-INF/spring-security.xml
    </param-value>
</context-param>
A complete web.xml file will look like this:
web.xml
<web-app id="WebApp_ID" version="2.5"
	xmlns="http://java.sun.com/xml/ns/j2ee"
	xmlns:xsi="http://www.w3.org/2001/XMLSchema-instance"
	xsi:schemaLocation="http://java.sun.com/xml/ns/j2ee
	http://java.sun.com/xml/ns/j2ee/web-app_2_5.xsd">

	<display-name>Spring MVC Application</display-name>

	<!-- Spring MVC -->
	<servlet>
		<servlet-name>mvc-dispatcher</servlet-name>
		<servlet-class>org.springframework.web.servlet.DispatcherServlet
		</servlet-class>
		<load-on-startup>1</load-on-startup>
	</servlet>
	<servlet-mapping>
		<servlet-name>mvc-dispatcher</servlet-name>
		<url-pattern>/</url-pattern>
	</servlet-mapping>

	<listener>
		<listener-class>org.springframework.web.context.ContextLoaderListener
		</listener-class>
	</listener>

        <!-- Loads Spring Security config file -->
	<context-param>
		<param-name>contextConfigLocation</param-name>
		<param-value>
			/WEB-INF/spring-security.xml
		</param-value>
	</context-param>

	<!-- Spring Security -->
	<filter>
		<filter-name>springSecurityFilterChain</filter-name>
		<filter-class>org.springframework.web.filter.DelegatingFilterProxy
		</filter-class>
	</filter>

	<filter-mapping>
		<filter-name>springSecurityFilterChain</filter-name>
		<url-pattern>/*</url-pattern>
	</filter-mapping>

</web-app>
Step 3. Adding security configuration in spring-security.xml
Let's create spring-security.xml under WEB-INF folder to add spring security configuration.
spring-security.xml
<beans:beans xmlns="http://www.springframework.org/schema/security"
	xmlns:beans="http://www.springframework.org/schema/beans"
	xmlns:xsi="http://www.w3.org/2001/XMLSchema-instance"
	xsi:schemaLocation="http://www.springframework.org/schema/beans
	http://www.springframework.org/schema/beans/spring-beans-3.0.xsd
	http://www.springframework.org/schema/security
	http://www.springframework.org/schema/security/spring-security-3.2.xsd">

	<http auto-config="true">
		<intercept-url pattern="/admin**" access="ROLE_USER" />
	</http>

	<authentication-manager>
	  <authentication-provider>
	    <user-service>
		<user name="mukesh" password="mukesh" authorities="ROLE_USER" />
	    </user-service>
	  </authentication-provider>
	</authentication-manager>

</beans:beans>
We will discuss all the elements defined in Spring Security configuration by using sample example so that it will be easy for you to understand.
Step 4. Create the controller class
Step 5. Create related views
Step 6. Test the application
Spring Security Example
In this example, you will learn how to integrate Spring Security with a Spring MVC web application to secure a URL access.
Our requirement is any normal user can access the normal user page but to access the Admin page user should be authenticated and only authorize user can access the page. We are going to implement Spring Security, to access the content of "admin" page, after securing the page users needs to enter correct "username" and "password" to access the page.
Tools and Technologies used:
- Spring 4.2.1.RELEASE
- Spring Security 3.2.3.RELEASE
- Eclipse Luna
- JDK 1.8
- Maven 3
Steps to be followed
- Update project dependencies in pom.xml
- Configure DelegatingFilterProxy in web.xml
- Add security configuration in application-security.xml
- Create the controller class
- Add related jsp views
- Test the application
1. Update project dependencies in pom.xml
Add Spring Security dependency in application pom.xml file. For our example we need to add three spring security dependencies.
- spring-security-core(contains core authentication and access-contol classes and interfaces)
- spring-security-web(contains filters and related web-security infrastructure code. It also enable URL based security which we are going to use in this demo)
- spring-security-config(contains the security namespace parsing code. It is required if you are using the Spring Security XML file for configuration)
complete pom.xml file is given below.
pom.xml
<?xml version="1.0" encoding="UTF-8"?>
<project xmlns="http://maven.apache.org/POM/4.0.0" xmlns:xsi="http://www.w3.org/2001/XMLSchema-instance"
	xsi:schemaLocation="http://maven.apache.org/POM/4.0.0 http://maven.apache.org/maven-v4_0_0.xsd">
	<modelVersion>4.0.0</modelVersion>
	<groupId>com.jwt</groupId>
	<artifactId>SpringSecurityDemo</artifactId>
	<name>SpringSecurityDemo</name>
	<packaging>war</packaging>
	<version>1.0.0-BUILD-SNAPSHOT</version>
	<properties>
		<java-version>1.8</java-version>
		<org.springframework-version>4.1.1.RELEASE</org.springframework-version>
		<spring.security.version>3.2.3.RELEASE</spring.security.version>
		<org.aspectj-version>1.6.10</org.aspectj-version>
		<org.slf4j-version>1.6.6</org.slf4j-version>
	</properties>
	<dependencies>
		<!-- Spring -->
		<dependency>
			<groupId>org.springframework</groupId>
			<artifactId>spring-context</artifactId>
			<version>${org.springframework-version}</version>
			<exclusions>
				<!-- Exclude Commons Logging in favor of SLF4j -->
				<exclusion>
					<groupId>commons-logging</groupId>
					<artifactId>commons-logging</artifactId>
				</exclusion>
			</exclusions>
		</dependency>
		<dependency>
			<groupId>org.springframework</groupId>
			<artifactId>spring-webmvc</artifactId>
			<version>${org.springframework-version}</version>
		</dependency>

		<!-- Spring Security -->
		<dependency>
			<groupId>org.springframework.security</groupId>
			<artifactId>spring-security-core</artifactId>
			<version>${spring.security.version}</version>
		</dependency>
		<dependency>
			<groupId>org.springframework.security</groupId>
			<artifactId>spring-security-web</artifactId>
			<version>${spring.security.version}</version>
		</dependency>
		<dependency>
			<groupId>org.springframework.security</groupId>
			<artifactId>spring-security-config</artifactId>
			<version>${spring.security.version}</version>
		</dependency>

		<!-- AspectJ -->
		<dependency>
			<groupId>org.aspectj</groupId>
			<artifactId>aspectjrt</artifactId>
			<version>${org.aspectj-version}</version>
		</dependency>

		<!-- Logging -->
		<dependency>
			<groupId>org.slf4j</groupId>
			<artifactId>slf4j-api</artifactId>
			<version>${org.slf4j-version}</version>
		</dependency>
		<dependency>
			<groupId>org.slf4j</groupId>
			<artifactId>jcl-over-slf4j</artifactId>
			<version>${org.slf4j-version}</version>
			<scope>runtime</scope>
		</dependency>
		<dependency>
			<groupId>org.slf4j</groupId>
			<artifactId>slf4j-log4j12</artifactId>
			<version>${org.slf4j-version}</version>
			<scope>runtime</scope>
		</dependency>
		<dependency>
			<groupId>log4j</groupId>
			<artifactId>log4j</artifactId>
			<version>1.2.15</version>
			<exclusions>
				<exclusion>
					<groupId>javax.mail</groupId>
					<artifactId>mail</artifactId>
				</exclusion>
				<exclusion>
					<groupId>javax.jms</groupId>
					<artifactId>jms</artifactId>
				</exclusion>
				<exclusion>
					<groupId>com.sun.jdmk</groupId>
					<artifactId>jmxtools</artifactId>
				</exclusion>
				<exclusion>
					<groupId>com.sun.jmx</groupId>
					<artifactId>jmxri</artifactId>
				</exclusion>
			</exclusions>
			<scope>runtime</scope>
		</dependency>

		<!-- Servlet -->
		<dependency>
			<groupId>javax.servlet</groupId>
			<artifactId>servlet-api</artifactId>
			<version>2.5</version>
			<scope>provided</scope>
		</dependency>
		<dependency>
			<groupId>javax.servlet.jsp</groupId>
			<artifactId>jsp-api</artifactId>
			<version>2.1</version>
			<scope>provided</scope>
		</dependency>
		<dependency>
			<groupId>javax.servlet</groupId>
			<artifactId>jstl</artifactId>
			<version>1.2</version>
		</dependency>

		<!-- Test -->
		<dependency>
			<groupId>junit</groupId>
			<artifactId>junit</artifactId>
			<version>4.7</version>
			<scope>test</scope>
		</dependency>
	</dependencies>
	<build>
		<finalName>SpringSecurityDemo</finalName>
	</build>
</project>
2. Configure DelegatingFilterProxy in web.xml
In the web deployment descriptor file (web.xml under /WEB-INF folder), we configure how Spring MVC and Spring Security are loaded when during the application startup time.
web.xml
<?xml version="1.0" encoding="UTF-8"?>
<web-app version="2.5" xmlns="http://java.sun.com/xml/ns/javaee"
	xmlns:xsi="http://www.w3.org/2001/XMLSchema-instance"
	xsi:schemaLocation="http://java.sun.com/xml/ns/javaee http://java.sun.com/xml/ns/javaee/web-app_2_5.xsd">

	<!-- Spring MVC -->
	<servlet>
		<servlet-name>spring</servlet-name>
		<servlet-class>org.springframework.web.servlet.DispatcherServlet</servlet-class>
		<load-on-startup>1</load-on-startup>
	</servlet>
	<servlet-mapping>
		<servlet-name>spring</servlet-name>
		<url-pattern>/</url-pattern>
	</servlet-mapping>

	<listener>
		<listener-class>org.springframework.web.context.ContextLoaderListener</listener-class>
	</listener>

	<!-- Loads Spring Security config file -->
	<context-param>
		<param-name>contextConfigLocation</param-name>
		<param-value>
			/WEB-INF/spring-security.xml
		</param-value>
	</context-param>

	<!-- Spring Security -->
	<filter>
		<filter-name>springSecurityFilterChain</filter-name>
		<filter-class>org.springframework.web.filter.DelegatingFilterProxy</filter-class>
	</filter>

	<filter-mapping>
		<filter-name>springSecurityFilterChain</filter-name>
		<url-pattern>/*</url-pattern>
	</filter-mapping>

</web-app>
In the above file we declared a Spring dispatcher servlet that handles all URLs coming to the application, and a Spring Web Context Loader Listener to loads Spring security configuration (in a Spring security configuration file named spring-security.xml file under /WEB-INF folder).
The responsibility of the Spring Security Filter is to intercept some URL patterns in order to apply authentication and authorization as configured in the Spring security configuration file which we declared as below.
<filter-mapping>
		<filter-name>springSecurityFilterChain</filter-name>
		<url-pattern>/*</url-pattern>
	</filter-mapping>
3. Add security specific configuration in spring-security.xml
Let's create spring-security.xml under WEB-INF folder to add spring security configuration.
spring-security.xml
<beans:beans xmlns="http://www.springframework.org/schema/security"
	xmlns:beans="http://www.springframework.org/schema/beans" xmlns:xsi="http://www.w3.org/2001/XMLSchema-instance"
	xsi:schemaLocation="http://www.springframework.org/schema/beans
	http://www.springframework.org/schema/beans/spring-beans-4.0.xsd
	http://www.springframework.org/schema/security
	http://www.springframework.org/schema/security/spring-security-3.2.xsd">

	<http auto-config="true">
		<intercept-url pattern="/admin**" access="ROLE_ADMIN" />
	</http>

	<authentication-manager>
		<authentication-provider>
			<user-service>
				<user name="mukesh" password="mukesh123" authorities="ROLE_ADMIN" />
			</user-service>
		</authentication-provider>
	</authentication-manager>

</beans:beans>
Important points of Spring Security Configuration
The <http> block states that we want to use web security. Web Security services are configured using <http>.
In the above security configuration file consider following line of codes
	<http auto-config="true">
		<intercept-url pattern="/admin**" access="ROLE_ADMIN" />
	</http>
These three lines of XML configure Spring security to intercept requests with "admin" URL as specified via <intercept-url> and restrict access to only authenticated users who have the "ROLE_ADMIN" role.As per this configuration, all the URL patterns /admin** are secured, and only the users having role ROLE_ADMIN can be authorized to access these URLs.You can use multiple <intercept-url> elements to define different access requirements for different sets of URLs, but they will be evaluated in the order listed and the first match will be used.
Setting auto-config="true" gives the application a login page, support for HTTP Basic authentication and support for logging out from the application.
The <authentication-manager> element is being used here to define a list of in-memory users and their passwords and role information, which is convenient for samples and demos. A real world application would more likely use a database, LDAP server or some single sign-on integration.
Let us Consider the authentication-manager element defined in the above security configuration file.
	<authentication-manager>
		<authentication-provider>
			<user-service>
				<user name="mukesh" password="mukesh123" authorities="ROLE_ADMIN" />
			</user-service>
		</authentication-provider>
	</authentication-manager>
Above line of code tells, only user "mukesh" is allowed to access the /admin URL.
4. Create Spring configuration file
Let's create spring-servlet.xml under WEB-INF folder.
spring-servlet.xml
<beans xmlns="http://www.springframework.org/schema/beans"
	xmlns:mvc="http://www.springframework.org/schema/mvc" xmlns:context="http://www.springframework.org/schema/context"
	xmlns:xsi="http://www.w3.org/2001/XMLSchema-instance"
	xsi:schemaLocation="
        http://www.springframework.org/schema/beans
        http://www.springframework.org/schema/beans/spring-beans.xsd
        http://www.springframework.org/schema/mvc
        http://www.springframework.org/schema/mvc/spring-mvc.xsd
        http://www.springframework.org/schema/context
        http://www.springframework.org/schema/context/spring-context.xsd">

	<context:component-scan base-package="com.jwt.spring" />

	<bean
		class="org.springframework.web.servlet.view.InternalResourceViewResolver">
		<property name="prefix">
			<value>/WEB-INF/views/</value>
		</property>
		<property name="suffix">
			<value>.jsp</value>
		</property>
	</bean>

</beans>
5. Creating Spring MVC Controller
Next, we will write code for a Spring controller in order to handle requests coming to the application. Create a Java class named HomeController under the package com.jwt.spring with the following code:
package com.jwt.spring;

import org.slf4j.Logger;
import org.slf4j.LoggerFactory;
import org.springframework.stereotype.Controller;
import org.springframework.ui.Model;
import org.springframework.web.bind.annotation.RequestMapping;

@Controller
public class HomeController {

	private static final Logger logger = LoggerFactory.getLogger(HomeController.class);

	@RequestMapping(value = "/")
	public String welcome(Model model) {
		logger.info("Inside welcome() method");
		model.addAttribute("name", "javawebtutor Spring Security Demo");
		model.addAttribute("description", "unsecured page !");
		return "welcome";

	}

	@RequestMapping(value = "/admin")
	public String adminPage(Model model) {
		logger.info("Inside adminPage() method");
		model.addAttribute("name", "javawebtutor Spring Security Demo");
		model.addAttribute("description", "Protected page !");
		return "admin";

	}

}
As you can see, this controller is designed to handle two requests
- "/": the request to the application’s context root, or home page.
- "/admin": the request to the administrator page, which will be secured by Spring security.
6. Creating View Page of the application
a)Creating Index Page(welcome.jsp)
Create a directory called views under the /WEB-INF directory, then create an welcome.jsp file with the following HTML code.
<html>
<body>
	<h1>Name : ${name}</h1>
	<h1>Description : ${description}</h1><br>
	<h2>
	<a href="admin">Click here for Admin Area</a>
	</h2>
</body>
</html>
b)Creating Admin Page(admin.jsp)
Next, create an admin.jsp file under the /WEB-INF/views directory with the following code.
<%@taglib prefix="c" uri="http://java.sun.com/jsp/jstl/core"%>
<%@page session="true"%>
<html>
<body>
	<h1>Name : ${name}</h1>
	<h1>Description : ${description}</h1>

	<c:if test="${pageContext.request.userPrincipal.name != null}">
		<h2>
			Welcome : ${pageContext.request.userPrincipal.name} | <a
				href="<c:url value="/j_spring_security_logout" />"> Logout</a>
		</h2>
	</c:if>
</body>
</html>
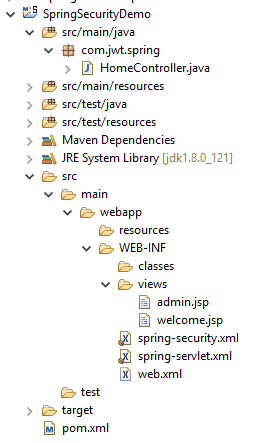
Final Project Structure
Test the Sample Application
Right click on the Project and then Run As -> Run on Server -> Select Tomcat 8.0 and then Finish.
type the following URL in your browser:
http://localhost:8080/SpringSecurityDemo/
You should see the index page looks like as following
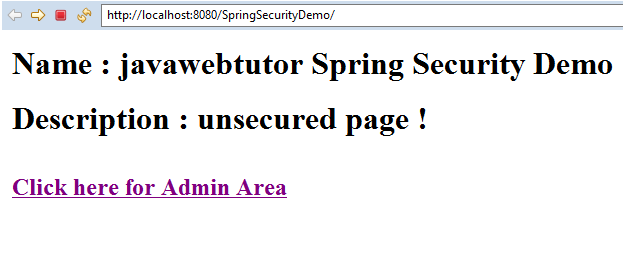
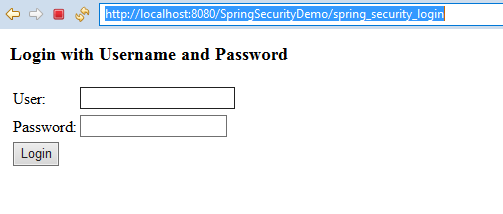
On this page, click on the link "Click here for Admin Area" which will open the URL http://localhost:8080/SpringSecurityDemo/admin. As this URL is secured with Spring Security ,Spring security redirects you to the default login page like this:
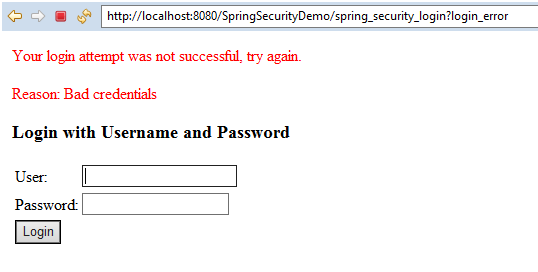
When user enters a wrong username and password, Spring security automatically generates error page with error message in red at the top of the form, as shown in the following screenshot:
Now, enter the correct username and password Spring takes you to the admin page:
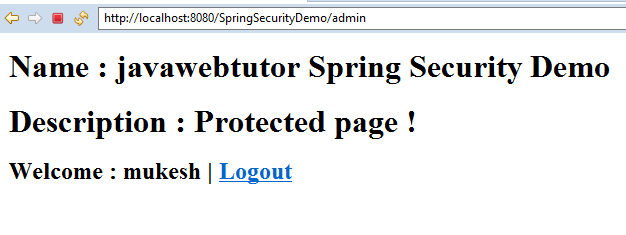
Now Click on the Logout link, Spring security filter automatically intercepts the /logout URL, invalidates the session and take you to the home page again:
You can download the source code of the example by clicking on the Download link below.
Related Articles

