How to use CSS, JavaScript and Images in Spring MVC Web App
Now a days it’s hard to imagine web-application which doesn’t has css,javascript and image files. In what way Spring MVC can deal with them? One of the most frequent questions which I receive from my blog readers is how to use css and javascript files in application with Spring MVC. So it’s a good time to write an article on How to use CSS, JavaScript and Images in Spring MVC Web App.
Here are the steps on how to access static resources in a Spring MVC. You can use this to access images, css, JavaScript files etc.
-
Place static resources like css, js or images into
webapp\resourcesdirectory. -
Create
mvc:resourcesmapping in spring configuration file. -
Use
page contextvariable to get the resources.Alternatively you can use JSTL tagc:urlor Spring tagspring:urltag.
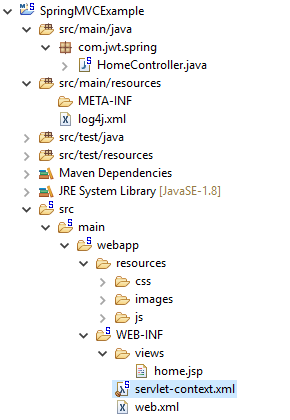
Project Structure:
The following screenshot shows final structure of the project:

Step 1: Create Dynamic Web Project
Please refer Spring - MVC Framework Tutorial for more details.
Step 2: Add Resource Mapping in Spring MVC configuration file
Declares mvc:resources, to map “url path” to a physical file path location.mvc:resources configures a handler for serving static resources such as images, js, and, css files with cache headers optimized for efficient loading in a web browser.Add the following entry to your Spring MVC configuration file:
<img src="${pageContext.request.contextPath}/resources/images/spring-logo.png">
servlet-context.xml
<beans xmlns="http://www.springframework.org/schema/beans"
    xmlns:mvc="http://www.springframework.org/schema/mvc"
	xmlns:context="http://www.springframework.org/schema/context"
	xmlns:xsi="http://www.w3.org/2001/XMLSchema-instance"
	xsi:schemaLocation="
        http://www.springframework.org/schema/beans
        http://www.springframework.org/schema/beans/spring-beans.xsd
        http://www.springframework.org/schema/mvc
        http://www.springframework.org/schema/mvc/spring-mvc.xsd
        http://www.springframework.org/schema/context
        http://www.springframework.org/schema/context/spring-context.xsd">

    <context:component-scan base-package="com.jwt.spring" />

    <bean
	class="org.springframework.web.servlet.view.InternalResourceViewResolver">
	<property name="prefix">
		<value>/WEB-INF/views/</value>
	</property>
	<property name="suffix">
		<value>.jsp</value>
	</property>
    </bean>

    <mvc:resources mapping="/resources/**" location="/resources/"
	cache-period="31556926"/>

    <mvc:annotation-driven />

</beans>
Step 3: Creating Deployment Descriptor (web.xml)
<?xml version="1.0" encoding="UTF-8"?>
<web-app version="2.5" xmlns="http://java.sun.com/xml/ns/javaee"
	xmlns:xsi="http://www.w3.org/2001/XMLSchema-instance"
	xsi:schemaLocation="http://java.sun.com/xml/ns/javaee http://java.sun.com/xml/ns/javaee/web-app_2_5.xsd">

<servlet>
    <servlet-name>dispatcher</servlet-name>
    <servlet-class>
        org.springframework.web.servlet.DispatcherServlet
    </servlet-class>
    <init-param>
        <param-name>contextConfigLocation</param-name>
        <param-value>/WEB-INF/servlet-context.xml</param-value>
    </init-param>
    <load-on-startup>1</load-on-startup>
 </servlet>

 <servlet-mapping>
    <servlet-name>dispatcher</servlet-name>
    <url-pattern>/</url-pattern>
 </servlet-mapping>

</web-app>
Step 4: Creating Folders to hold static contents
Create resources folder under WebContent folder.Create folder named 'js', 'images' and 'css' inside 'resources' directory of WebContent folder of your appliction. We will keep all the static files(css,js,images) there.
Step 5: Creating css and js files
We are going to create style.css and sample.js files to simply test the effect of css and js file.
style.css
body {
    background-color: lightblue;
}

h2 {
    color: Blue;
    text-align: left;
}

p {
    font-family: verdana;
    font-size: 20px;
    font-color: Red;
}
sample.js
function doSomeWork() {

	alert("wow js is working in spring mvc....");

}
Now copy style.css to css folder, sample.js to js folder and image to images folder which you created.
Step 6: Creating Controller
package com.jwt.spring;

import java.text.DateFormat;
import java.util.Date;
import java.util.Locale;

import org.slf4j.Logger;
import org.slf4j.LoggerFactory;
import org.springframework.stereotype.Controller;
import org.springframework.ui.Model;
import org.springframework.web.bind.annotation.RequestMapping;
import org.springframework.web.bind.annotation.RequestMethod;

/**
 * Handles requests for the application home page.
 */
@Controller
public class HomeController {

	private static final Logger logger = LoggerFactory.getLogger(HomeController.class);

	/**
	 * Simply selects the home view to render by returning its name.
	 */
	@RequestMapping(value = "/", method = RequestMethod.GET)
	public String home(Locale locale, Model model) {
		logger.info("Welcome home! The client locale is {}.", locale);

		Date date = new Date();
		DateFormat dateFormat = DateFormat.getDateTimeInstance(DateFormat.LONG, DateFormat.LONG, locale);

		String formattedDate = dateFormat.format(date);

		model.addAttribute("serverTime", formattedDate);

		return "home";
	}

}
Step 7: Access the static files in your application view pages
Now in your view pages, you can access the static files using following code:
<img src="${pageContext.request.contextPath}/resources/images/spring-logo.png">
You need to use the JSP expression ${pageContext.request.contextPath} to access the correct root directory for your web application.Apply the same technique for reading CSS and JavaScript. Following is the code of home.jsp file in which we used css,jss and images.
home.jsp
<%@ taglib uri="http://java.sun.com/jsp/jstl/core" prefix="c"%>
<%@ page session="false"%>
<html>
<head>
<title>Home</title>
<link href="${pageContext.request.contextPath}/resources/css/style.css"
	rel="stylesheet">
<script src="${pageContext.request.contextPath}/resources/js/sample.js"></script>
</head>
<body>
	<h2>Hi this style is defined in css file</h2>

	<P>The time on the server is ${serverTime}.</P>

	<br>
	<br>

	<img
		src="${pageContext.request.contextPath}/resources/images/spring.png" />

	<br>
	<br>

	<input type="button" onclick="doSomeWork()" value="Click Me" />

</body>
</html>
Testing the Application
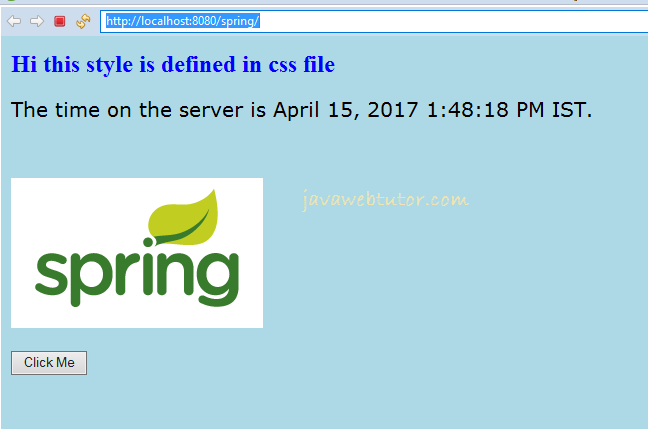
This application can be deployed in a Tomcat server and accessed locally by using below URL.
http://localhost:8080/spring/
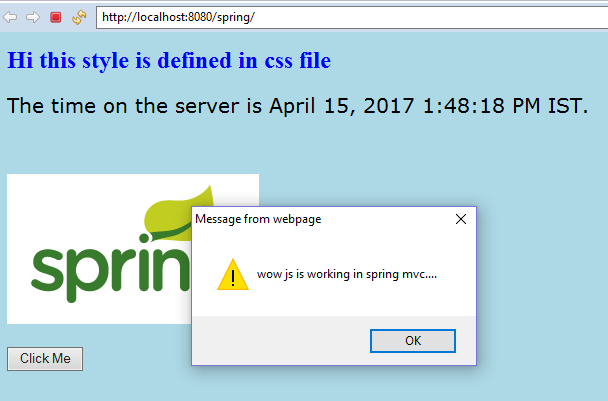
Output in Browser


References:- Spring MVC Documentation
Related Articles

