Spring Security Custom Login Form Example
In my previous post Spring Security Tutorial I have used default login form generated by Spring Security framework by simply turning <http auto-config> element to "true" in the spring configuration file. But real time application use their own custom login form instead of spring provided form.
In this post, we will discuss how to use custom login page in Spring security framework.
You need to follow below steps to apply spring security custom login form on spring mvc hello world example.
Step 1: Create Dynamic Web Project in Maven
Create a Dynamic Web Project named "SpringSecurityCustomLoginForm" by using maven. Please refer Spring MVC Form Handling Example if you are not familier with the steps.
Step 2: Update project dependencies in pom.xml
Include spring security dependency in the pom.xml.
<?xml version="1.0" encoding="UTF-8"?>
<project xmlns="http://maven.apache.org/POM/4.0.0" xmlns:xsi="http://www.w3.org/2001/XMLSchema-instance"
	xsi:schemaLocation="http://maven.apache.org/POM/4.0.0 http://maven.apache.org/maven-v4_0_0.xsd">
	<modelVersion>4.0.0</modelVersion>
	<groupId>com.jwt</groupId>
	<artifactId>SpringSecCustomLoginDemo</artifactId>
	<name>SpringSecCustomLoginDemo</name>
	<packaging>war</packaging>
	<version>1.0.0-BUILD-SNAPSHOT</version>

	<properties>
		<spring.version>4.2.1.RELEASE</spring.version>
		<security.version>4.0.3.RELEASE</security.version>
		<jdk.version>1.8</jdk.version>
	</properties>
	<dependencies>

		<dependency>
			<groupId>junit</groupId>
			<artifactId>junit</artifactId>
			<version>3.8.1</version>
			<scope>test</scope>
		</dependency>

		<dependency>
			<groupId>org.springframework</groupId>
			<artifactId>spring-core</artifactId>
			<version>${spring.version}</version>
		</dependency>
		<dependency>
			<groupId>org.springframework</groupId>
			<artifactId>spring-webmvc</artifactId>
			<version>${spring.version}</version>
		</dependency>
		<!-- Spring Security -->
		<dependency>
			<groupId>org.springframework.security</groupId>
			<artifactId>spring-security-core</artifactId>
			<version>${security.version}</version>
		</dependency>

		<dependency>
			<groupId>org.springframework.security</groupId>
			<artifactId>spring-security-web</artifactId>
			<version>${security.version}</version>
		</dependency>

		<dependency>
			<groupId>org.springframework.security</groupId>
			<artifactId>spring-security-config</artifactId>
			<version>${security.version}</version>
		</dependency>

		<!-- Servlet -->
		<dependency>
			<groupId>javax.servlet</groupId>
			<artifactId>servlet-api</artifactId>
			<version>2.5</version>
			<scope>provided</scope>
		</dependency>
		<dependency>
			<groupId>javax.servlet.jsp</groupId>
			<artifactId>jsp-api</artifactId>
			<version>2.1</version>
			<scope>provided</scope>
		</dependency>
		<dependency>
			<groupId>javax.servlet</groupId>
			<artifactId>jstl</artifactId>
			<version>1.2</version>
		</dependency>

	</dependencies>
	<build>
		<finalName>SpringSecCustomLoginDemo</finalName>

		<plugins>
			<plugin>
				<groupId>org.apache.maven.plugins</groupId>
				<artifactId>maven-compiler-plugin</artifactId>
				<version>3.1</version>
				<configuration>
					<source>${jdk.version}</source>
					<target>${jdk.version}</target>
				</configuration>
			</plugin>
		</plugins>

	</build>


</project>
Step 3: Configure web.xml
In the web deployment descriptor file (web.xml under /WEB-INF folder), we configure how Spring MVC and Spring Security are loaded when during the application startup time.
web.xml
<?xml version="1.0" encoding="UTF-8"?>
<web-app xmlns:xsi="http://www.w3.org/2001/XMLSchema-instance"
	xmlns="http://java.sun.com/xml/ns/javaee"
	xsi:schemaLocation="http://java.sun.com/xml/ns/javaee http://java.sun.com/xml/ns/javaee/web-app_2_5.xsd"
	version="2.5">
	<servlet>
		<servlet-name>spring</servlet-name>
		<servlet-class>org.springframework.web.servlet.DispatcherServlet</servlet-class>
		<load-on-startup>1</load-on-startup>
	</servlet>
	<servlet-mapping>
		<servlet-name>spring</servlet-name>
		<url-pattern>/</url-pattern>
	</servlet-mapping>
	<listener>
		<listener-class>org.springframework.web.context.ContextLoaderListener</listener-class>
	</listener>
	<context-param>
		<param-name>contextConfigLocation</param-name>
		<param-value>
            /WEB-INF/spring-security.xml
        </param-value>
	</context-param>
	<filter>
		<filter-name>springSecurityFilterChain</filter-name>
		<filter-class>org.springframework.web.filter.DelegatingFilterProxy</filter-class>
	</filter>
	<filter-mapping>
		<filter-name>springSecurityFilterChain</filter-name>
		<url-pattern>/*</url-pattern>
	</filter-mapping>
</web-app>
Step 4: Add security specific configuration in spring-security.xml
Let's create spring-security.xml under WEB-INF folder to add spring security configuration.
spring-security.xml
<beans:beans xmlns="http://www.springframework.org/schema/security"
	xmlns:beans="http://www.springframework.org/schema/beans" xmlns:xsi="http://www.w3.org/2001/XMLSchema-instance"
	xsi:schemaLocation="http://www.springframework.org/schema/beans
    http://www.springframework.org/schema/beans/spring-beans-4.0.xsd
    http://www.springframework.org/schema/security
    http://www.springframework.org/schema/security/spring-security-4.0.xsd">

	<http auto-config="true" use-expressions="true">
		<intercept-url pattern="/admin*" access="hasRole('ROLE_ADMIN')" />

		<form-login login-page="/login" default-target-url="/admin"
			authentication-failure-url="/loginError" />
		<logout logout-success-url="/logout" logout-url="/j_spring_security_logout" />
		<csrf disabled="true" />
	</http>

	<authentication-manager>
		<authentication-provider>
			<user-service>
				<user name="mukesh" password="mukesh123" authorities="ROLE_ADMIN" />
				<user name="ravi" password="ravi123" authorities="ROLE_ADMIN" />

			</user-service>
		</authentication-provider>
	</authentication-manager>

</beans:beans>
In the above security configuration xml file we have used <form-login> element. If an user tries to access any secured URL, then user will be authenticated with custom login page based on the configuration of <form-login> element.
Lets understand meaning of each attribute of form-login tag
- login-page : we need to specify the path of controller which returns the custom login page.In our case URL is /login.
- default-target-url : default-target-url specifies the path of a method in controller where it has to go after successful authentication, in our case it is /admin.
- authentication-failure-url : authentication-failure-url specifies the path of a method in controller where it has to go if authentication is failed.In our case it is /loginError .
intercept-url configures for particular URL pattern what kind of security is configured. For example: If http request url has pattern /hello*(hello.jsp,helloworld.jsp,helloworld.html etc), it will be accessed by "ROLE_ADMIN" role only.
The <authentication-manager> element is being used here to define a list of in-memory users and their passwords and role information.We have hardcoded username(mukesh and ravi) and password(mukesh123 and ravi123) in authentication manager, so if user provides correct credential for admin then only he will be able to access /admin url.
Step 5: Create Spring configuration file
Let's create spring-mvc.xml under WEB-INF folder.
spring-mvc.xml
<beans xmlns="http://www.springframework.org/schema/beans"
	xmlns:mvc="http://www.springframework.org/schema/mvc" xmlns:context="http://www.springframework.org/schema/context"
	xmlns:xsi="http://www.w3.org/2001/XMLSchema-instance"
	xsi:schemaLocation="
        http://www.springframework.org/schema/beans
        http://www.springframework.org/schema/beans/spring-beans.xsd
        http://www.springframework.org/schema/mvc
        http://www.springframework.org/schema/mvc/spring-mvc.xsd
        http://www.springframework.org/schema/context
        http://www.springframework.org/schema/context/spring-context.xsd">

	<context:component-scan base-package="com.jwt.spring" />

	<bean
		class="org.springframework.web.servlet.view.InternalResourceViewResolver">
		<property name="prefix">
			<value>/WEB-INF/views/</value>
		</property>
		<property name="suffix">
			<value>.jsp</value>
		</property>
	</bean>

</beans>
Step 6: Creating Spring MVC Controller
Create the LoginController class to map the requests.
package com.jwt.spring;

import java.security.Principal;

import org.springframework.stereotype.Controller;
import org.springframework.ui.Model;
import org.springframework.ui.ModelMap;
import org.springframework.web.bind.annotation.RequestMapping;
import org.springframework.web.bind.annotation.RequestMethod;

@Controller
public class LoginController {

	@RequestMapping(value = "/")
	public String welcome(Model model) {
		model.addAttribute("name", "Home Page");
		model.addAttribute("description", "unsecured page !");
		return "home";

	}

	@RequestMapping("/admin")
	public String admin(Model model, Principal principal) {

		String loggedInUserName = principal.getName();
		model.addAttribute("user", loggedInUserName);
		model.addAttribute("name", "Spring Security Custom Login Demo");
		model.addAttribute("description", "Protected page !");
		return "admin";
	}

	@RequestMapping(value = "/login", method = RequestMethod.GET)
	public String login(ModelMap model) {

		return "login";

	}

	@RequestMapping(value = "/logout", method = RequestMethod.GET)
	public String logout(ModelMap model) {

		model.addAttribute("message",
				"You have successfully logged off from application !");
		return "logout";

	}

	@RequestMapping(value = "/loginError", method = RequestMethod.GET)
	public String loginError(ModelMap model) {
		model.addAttribute("error", "true");
		return "login";

	}
}
As you can see, this controller is designed to handle five requests
- "/": the request to the application’s context root, or app landing page.
- "/admin": the request to the administrator page, which will be secured by Spring security.
- "/login": the request to the login page.
- "/loginError": authentication-failure-url.
- "/logout": logout-url.
admin() method of LoginController.java will handle all the request with /admin url. In this method we have used Model and Principal Object as a parameter.The Model is container for our application data. Principal object is used to get current logged in username. It is set by Spring security framework.
Step 7: Creating View Page of the application
a)Creating Index Page(home.jsp)
Create a directory called views under the /WEB-INF directory, then create an home.jsp file with the following HTML code.
<html>
<body>
	<h1>Name : ${name}</h1>
	<h1>Description : ${description}</h1>
	<br>
	<h2>
		<a href="admin">Click here for Admin Area</a>
	</h2>
</body>
</html>
b)Creating Admin Page(admin.jsp)
Next, create an admin.jsp file under the /WEB-INF/views directory with the following code.
<%@taglib prefix="c" uri="http://java.sun.com/jsp/jstl/core"%>
<%@page session="true"%>
<html>
<body>
    <h1>Name : ${name}</h1>
    <h1>Description : ${description}</h1>

    <c:if test="${pageContext.request.userPrincipal.name != null}">
        <h2>
            Welcome : ${user} | <a
                href="<c:url value="/j_spring_security_logout" />"> Logout</a>
        </h2>
    </c:if>
</body>
</html>
c)Creating login Page(login.jsp)
Next, create an login.jsp file under the /WEB-INF/views directory with the following code.
<%@ taglib prefix="c" uri="http://java.sun.com/jsp/jstl/core"%>
<html>

<head>
<title>Custom Login Page</title>

<style>
.errorblock {
	color: #ff0000;
	background-color: #ffEEEE;
}
</style>
</head>
<body onload='document.loginForm.j_username.focus();'>
	<h3>Custom Login Page</h3>

	<%
		String errorString = (String) request.getAttribute("error");
		if (errorString != null && errorString.trim().equals("true")) {
			out.println("<span class=\"errorblock\">Incorrect login name or password. Please try again");
		}
	%>

	<form name='loginForm' action="<c:url value='login' />"
		"
method='POST'>

		<table>
			<tr>
				<td>User:</td>
				<td><input type='text' name='username' value=''></td>
			</tr>
			<tr>
				<td>Password:</td>
				<td><input type='password' name='password' /></td>
			</tr>
			<tr>
				<td><input name="submit" type="submit" value="submit" /></td>
				<td><input name="reset" type="reset" /></td>
			</tr>
		</table>

	</form>
</body>
</html>
d)Creating logout Page(logout.jsp)
Next, create an logout.jsp file under the /WEB-INF/views directory with the following code.
<%@taglib prefix="c" uri="http://java.sun.com/jsp/jstl/core"%>
<%@page session="true"%>
<html>
<head>
<meta http-equiv="Content-Type" content="text/html; charset=ISO-8859-1">
<title>logout page</title>
</head>
<body>
 <h1>You have successfully logged off from application !</h1>
</body>
</html>
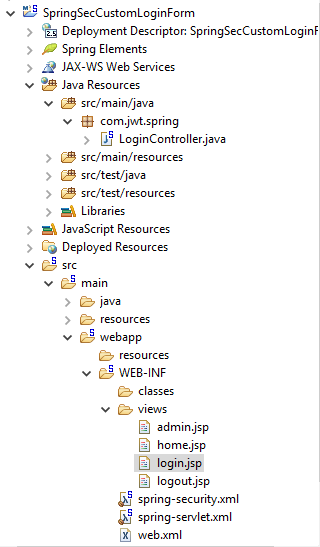
Final Project Structure
Test the Sample Application
Right click on the Project and then Run As -> Run on Server -> Select Tomcat 8.0 and then Finish.
type the following URL in your browser:
http://localhost:8080/SpringSecCustomLoginDemo/
You should see the index page looks like as following
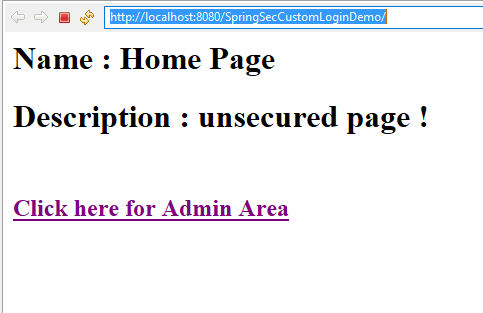
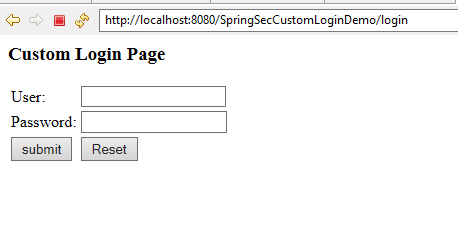
On this page, click on the link "Click here for Admin Area" which will open the URL http://localhost:8080/SpringSecurityDemo/admin. As this URL is secured with Spring Security ,Spring security redirects you to the custom login page like this:
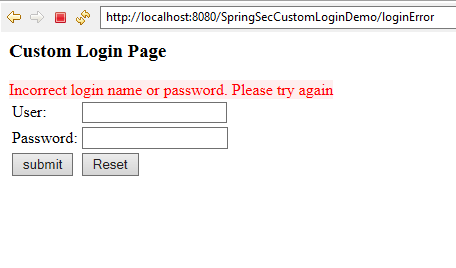
If username/password is wrong, authentication failed, display custom error messages as shown below.
Now, enter the correct username and password Spring security takes you to the admin page whose URL is http://localhost:8080/SpringSecCustomLoginDemo/admin.
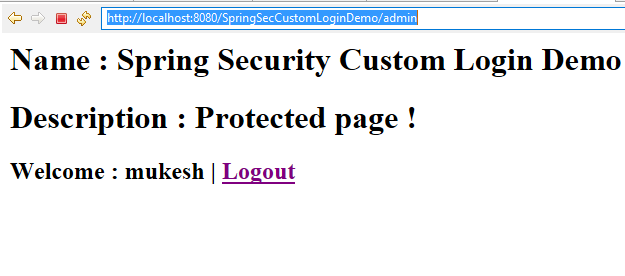
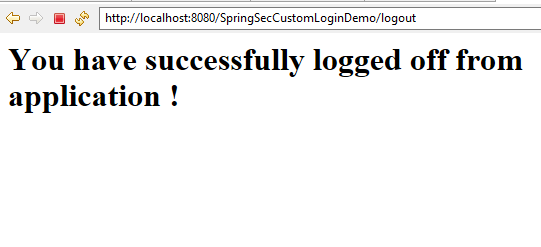
On clicking 'Logout' link, user be logged out and forwarded to logout page.
You can download the source code of the example by clicking on the Download link below.
Related Articles

