CRUD Example using Spring MVC, Hibernate, Maven and MySQL
In this post I am going to explain how to develop a Simple CRUD application using Spring MVC and Hibernate. I used MySQL as database and Maven as a build tool for the project. Our Application is Employee Management system where you can view or search employee, create new empoloyee, edit or delete existing employee.
Tools and Technologies used:
- Spring 4.1.5 RELEASE
- Hibernate 4.3.8 Final
- MySQL 5.1.10
- Java 7
- Eclipse
- Tomcat 7
- Maven 3
Project Structure:
The following screenshot shows final structure of the project:
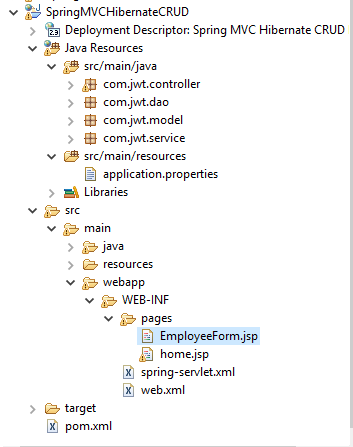
Follow the steps mentioned below to develop this application.
Step 1: Create Database Table
Create a EMP_DB table in MySQL database. SQL statement to create the table is given below.
CREATE TABLE `EMP_TBL` (
  `id` int(11) NOT NULL AUTO_INCREMENT,
  `name` varchar(45) NOT NULL,
  `email` varchar(45) NOT NULL,
  `address` varchar(45) NOT NULL,
  `telephone` varchar(45) NOT NULL,
  PRIMARY KEY (`id`)
) ENGINE=InnoDB AUTO_INCREMENT=25 DEFAULT CHARSET=utf8;
Step 2: Create Dynamic Web Project in Maven
To create dynamic web project with maven, navigate to the folder where you want to create the project and execute following command in Command Prompt.
mvn archetype:generate -DgroupId=com.jwt.spring -DartifactId=SpringMVCHibernateCRUD -DarchetypeArtifactId=maven-archetype-webapp -DinteractiveMode=false
Step 3: Convert Maven Project to support Eclipse
To make maven project support eclipse IDE navigate to project folder and type followingcommand in terminal window.
mvn eclipse:eclipse -Dwtpversion=2.0
Now Import the project into eclipse, you will see a folder structure like this :
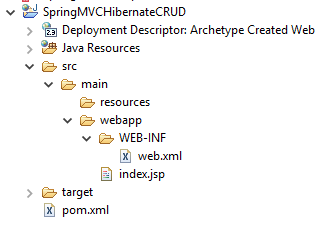
Step 4: Add project dependency in pom.xml
<project xmlns="http://maven.apache.org/POM/4.0.0" xmlns:xsi="http://www.w3.org/2001/XMLSchema-instance"
	xsi:schemaLocation="http://maven.apache.org/POM/4.0.0 http://maven.apache.org/maven-v4_0_0.xsd">
	<modelVersion>4.0.0</modelVersion>
	<groupId>com.jwt.spring</groupId>
	<artifactId>SpringMVCHibernateCRUD</artifactId>
	<packaging>war</packaging>
	<version>1.0-SNAPSHOT</version>
	<name>SpringMVCHibernateCRUD Maven Webapp</name>
	<url>http://maven.apache.org</url>
       <!-- Specifying the Versions of Spring, Hiberante, MySQL etc -->
       <properties>
        <spring.version>4.1.5.RELEASE</spring.version>
        <hibernate.version>4.3.8.Final</hibernate.version>
        <mysql.version>5.1.10</mysql.version>
        <junit-version>4.11</junit-version>
        <servlet-api-version>3.1.0</servlet-api-version>
        <jsp-version>2.1</jsp-version>
        <jstl-version>1.2</jstl-version>
        <java.version>1.7</java.version>

    </properties>
       <dependencies>
              <dependency>
            <groupId>org.springframework</groupId>
            <artifactId>spring-core</artifactId>
            <version>${spring.version}</version>
        </dependency>

        <dependency>
            <groupId>org.springframework</groupId>
            <artifactId>spring-context</artifactId>
            <version>${spring.version}</version>
        </dependency>

        <dependency>
            <groupId>org.springframework</groupId>
            <artifactId>spring-web</artifactId>
            <version>${spring.version}</version>
        </dependency>

        <dependency>
            <groupId>org.springframework</groupId>
            <artifactId>spring-webmvc</artifactId>
            <version>${spring.version}</version>
        </dependency>

        <dependency>
            <groupId>org.springframework</groupId>
            <artifactId>spring-orm</artifactId>
            <version>${spring.version}</version>
        </dependency>

        <dependency>
            <groupId>org.springframework</groupId>
            <artifactId>spring-test</artifactId>
            <version>${spring.version}</version>
            <scope>test</scope>
        </dependency>

        <!-- Hibernate 4 dependencies -->
        <dependency>
            <groupId>org.hibernate</groupId>
            <artifactId>hibernate-core</artifactId>
            <version>${hibernate.version}</version>
        </dependency>

        <dependency>
            <groupId>org.hibernate</groupId>
            <artifactId>hibernate-c3p0</artifactId>
            <version>${hibernate.version}</version>
        </dependency>

        <!--MYSQL Connector -->
        <dependency>
            <groupId>mysql</groupId>
            <artifactId>mysql-connector-java</artifactId>
            <version>${mysql.version}</version>
        </dependency>

        <!-- Servlet and JSP -->
        <dependency>
            <groupId>javax.servlet</groupId>
            <artifactId>javax.servlet-api</artifactId>
            <version>${servlet-api-version}</version>
        </dependency>

        <dependency>
            <groupId>javax.servlet.jsp</groupId>
            <artifactId>jsp-api</artifactId>
            <version>${jsp-version}</version>
            <scope>provided</scope>
        </dependency>

        <!-- JSTL dependency -->
        <dependency>
            <groupId>jstl</groupId>
            <artifactId>jstl</artifactId>
            <version>${jstl-version}</version>
        </dependency>

        <!-- JUnit -->
        <dependency>
            <groupId>junit</groupId>
            <artifactId>junit</artifactId>
            <version>${junit-version}</version>
            <scope>test</scope>
        </dependency>

       </dependencies>
       <build>
              <finalName>SpringMVCHibernateCRUD</finalName>
              <plugins>
              <plugin>
                <artifactId>maven-surefire-plugin</artifactId>
                <configuration>
                    <includes>
                        <include>**/*Tests.java</include>
                    </includes>
                </configuration>
            </plugin>
            <plugin>
                <artifactId>maven-compiler-plugin</artifactId>
                <version>2.3.2</version>
                <configuration>
                    <source>${java.version}</source>
                    <target>${java.version}</target>
                </configuration>
            </plugin>
        </plugins>

       </build>
</project>
Step 5: Declaring hibernate and database properties
Create application.properties file under resources folder and define databse and hibernate configuration information in this
#Database related properties
database.driver=com.mysql.jdbc.Driver
database.url=jdbc:mysql://localhost:3306/spring
database.user=root
database.password=12345

#Hibernate related properties
hibernate.dialect=org.hibernate.dialect.MySQLDialect
hibernate.show_sql=true
hibernate.format_sql=true
hibernate.hbm2ddl.auto=update
Step 6: Creating Deployment Descriptor (web.xml)
We need to configure spring MVC framework in our application, that can be done by configuring Spring framework DispatcherServlet as front controller in web.xml as below.
<?xml version="1.0" encoding="ISO-8859-1" ?>
<web-app xmlns="http://java.sun.com/xml/ns/javaee" xmlns:xsi="http://www.w3.org/2001/XMLSchema-instance"
    xsi:schemaLocation="http://java.sun.com/xml/ns/javaee
          http://java.sun.com/xml/ns/javaee/web-app_3_0.xsd"
    version="3.0">

	<display-name>Spring MVC Hibernate CRUD Example</display-name>

	<context-param>
		<param-name>contextConfigLocation</param-name>
		<param-value>/WEB-INF/spring-servlet.xml</param-value>
	</context-param>
	<listener>
		<listener-class>org.springframework.web.context.ContextLoaderListener</listener-class>
	</listener>
	<servlet>
		<servlet-name>spring</servlet-name>
		<servlet-class>
			org.springframework.web.servlet.DispatcherServlet
		</servlet-class>
		<load-on-startup>1</load-on-startup>
	</servlet>

	<servlet-mapping>
		<servlet-name>spring</servlet-name>
		<url-pattern>/</url-pattern>
	</servlet-mapping>

</web-app>
Step 7: Creating Spring Configuration File (spring-servlet.xml)
<beans xmlns="http://www.springframework.org/schema/beans"
	xmlns:xsi="http://www.w3.org/2001/XMLSchema-instance" xmlns:tx="http://www.springframework.org/schema/tx"
	xmlns:mvc="http://www.springframework.org/schema/mvc" xmlns:context="http://www.springframework.org/schema/context"
	xsi:schemaLocation="http://www.springframework.org/schema/beans http://www.springframework.org/schema/beans/spring-beans.xsd
       http://www.springframework.org/schema/tx http://www.springframework.org/schema/tx/spring-tx.xsd
       http://www.springframework.org/schema/mvc http://www.springframework.org/schema/mvc/spring-mvc.xsd
       http://www.springframework.org/schema/context http://www.springframework.org/schema/context/spring-context.xsd">

	<!-- Specifying base package of the Components like Controller, Service,
		DAO -->
	<context:component-scan base-package="com.jwt" />

	<!-- Getting Database properties -->
	<context:property-placeholder location="classpath:application.properties" />

	<mvc:annotation-driven />

	<!-- Specifying the Resource location to load JS, CSS, Images etc -->
	<mvc:resources mapping="/resources/**" location="/resources/" />

	<!-- View Resolver -->
	<bean
		class="org.springframework.web.servlet.view.InternalResourceViewResolver">
		<property name="prefix" value="/WEB-INF/pages/" />
		<property name="suffix" value=".jsp" />
	</bean>

	<!-- DataSource -->
	<bean class="org.springframework.jdbc.datasource.DriverManagerDataSource"
		id="dataSource">
		<property name="driverClassName" value="${database.driver}"></property>
		<property name="url" value="${database.url}"></property>
		<property name="username" value="${database.user}"></property>
		<property name="password" value="${database.password}"></property>
	</bean>

	<!-- Hibernate SessionFactory -->
	<bean id="sessionFactory"
		class="org.springframework.orm.hibernate4.LocalSessionFactoryBean">
		<property name="dataSource" ref="dataSource"></property>
		<property name="hibernateProperties">
			<props>
				<prop key="hibernate.dialect">${hibernate.dialect}</prop>
				<prop key="hibernate.hbm2ddl.auto">${hibernate.hbm2ddl.auto}</prop>
				<prop key="hibernate.format_sql">${hibernate.format_sql}</prop>
				<prop key="hibernate.show_sql">${hibernate.show_sql}</prop>
			</props>
		</property>
		<property name="packagesToScan" value="com.jwt.model"></property>
	</bean>

	<!-- Transaction -->
	<bean id="transactionManager"
		class="org.springframework.orm.hibernate4.HibernateTransactionManager">
		<property name="sessionFactory" ref="sessionFactory" />
	</bean>

	<tx:annotation-driven transaction-manager="transactionManager" />
</beans>
Step 8 : Create java directory :
Create a folder named 'java' under main."/src/main" and add this folder to the class path of the project.
Step 9: Creating Persistence Layer
Employee.java
package com.jwt.model;

import java.io.Serializable;

import javax.persistence.Column;
import javax.persistence.Entity;
import javax.persistence.GeneratedValue;
import javax.persistence.GenerationType;
import javax.persistence.Id;
import javax.persistence.Table;

@Entity
@Table(name = "EMP_TBL")
public class Employee implements Serializable {

	private static final long serialVersionUID = -3465813074586302847L;

	@Id
	@GeneratedValue(strategy = GenerationType.AUTO)
	private int id;

	@Column
	private String name;

	@Column
	private String email;

	@Column
	private String address;

	@Column
	private String telephone;

	public int getId() {
		return id;
	}

	public void setId(int id) {
		this.id = id;
	}

	public String getName() {
		return name;
	}

	public void setName(String name) {
		this.name = name;
	}

	public String getEmail() {
		return email;
	}

	public void setEmail(String email) {
		this.email = email;
	}

	public String getAddress() {
		return address;
	}

	public void setAddress(String address) {
		this.address = address;
	}

	public String getTelephone() {
		return telephone;
	}

	public void setTelephone(String telephone) {
		this.telephone = telephone;
	}

}
In the above class @Entity annotation is used to mark this class as an Entity bean.
The @Table annotation is used to specify the table to persist the data. The name attribute refers to the table name. If @Table annotation is not specified then Hibernate will by default use the class name as the table name.
The @Id annotation is used to specify the identifier property of the entity bean. The placement of the @Idannotation determines the default access strategy that Hibernate will use for the mapping. If the @Id annotation is placed over the field, then filed access will be used. Instead if it placed over the getter method of that field, then property access will be used. Here we use property access.
The @GeneratedValue annotation is used to specify the primary key generation strategy to use. If the strategy is not specified by default AUTO will be used.
Step 10: Creating DAO Layer
Data access layer of our application consist of EmployeeDao Interface and its implementation EmployeeDaoImpl class. The EmployeeDaoImpl class has a @Repository annotation which used to enable this class to eligible for persistence exception translation.
EmployeeDao.java
package com.jwt.dao;

import java.util.List;
import com.jwt.model.Employee;

public interface EmployeeDAO {

	public void addEmployee(Employee employee);

	public List<Employee> getAllEmployees();

	public void deleteEmployee(Integer employeeId);

	public Employee updateEmployee(Employee employee);

	public Employee getEmployee(int employeeid);
}
EmployeeDaoImpl.java
package com.jwt.dao;

import java.util.List;

import org.hibernate.SessionFactory;
import org.springframework.beans.factory.annotation.Autowired;
import org.springframework.stereotype.Repository;

import com.jwt.model.Employee;

@Repository
public class EmployeeDAOImpl implements EmployeeDAO {

	@Autowired
	private SessionFactory sessionFactory;

	public void addEmployee(Employee employee) {
		sessionFactory.getCurrentSession().saveOrUpdate(employee);

	}

	@SuppressWarnings("unchecked")
	public List<Employee> getAllEmployees() {

		return sessionFactory.getCurrentSession().createQuery("from Employee")
				.list();
	}

	@Override
	public void deleteEmployee(Integer employeeId) {
		Employee employee = (Employee) sessionFactory.getCurrentSession().load(
				Employee.class, employeeId);
		if (null != employee) {
			this.sessionFactory.getCurrentSession().delete(employee);
		}

	}

	public Employee getEmployee(int empid) {
		return (Employee) sessionFactory.getCurrentSession().get(
				Employee.class, empid);
	}

	@Override
	public Employee updateEmployee(Employee employee) {
		sessionFactory.getCurrentSession().update(employee);
		return employee;
	}

}
Step 11: Creating Service Layer
Service layer also consist of one Service interface EmployeeService and its implementation class EmployeeServiceImpl.java.
EmployeeService.java
package com.jwt.service;

import java.util.List;

import com.jwt.model.Employee;

public interface EmployeeService {

	public void addEmployee(Employee employee);

	public List<Employee> getAllEmployees();

	public void deleteEmployee(Integer employeeId);

	public Employee getEmployee(int employeeid);

	public Employee updateEmployee(Employee employee);
}
EmployeeServiceImpl.java
package com.jwt.service;

import java.util.List;

import org.springframework.beans.factory.annotation.Autowired;
import org.springframework.stereotype.Service;
import org.springframework.transaction.annotation.Transactional;

import com.jwt.dao.EmployeeDAO;
import com.jwt.model.Employee;

@Service
@Transactional
public class EmployeeServiceImpl implements EmployeeService {

	@Autowired
	private EmployeeDAO employeeDAO;

	@Override
	@Transactional
	public void addEmployee(Employee employee) {
		employeeDAO.addEmployee(employee);
	}

	@Override
	@Transactional
	public List<Employee> getAllEmployees() {
		return employeeDAO.getAllEmployees();
	}

	@Override
	@Transactional
	public void deleteEmployee(Integer employeeId) {
		employeeDAO.deleteEmployee(employeeId);
	}

	public Employee getEmployee(int empid) {
		return employeeDAO.getEmployee(empid);
	}

	public Employee updateEmployee(Employee employee) {
		// TODO Auto-generated method stub
		return employeeDAO.updateEmployee(employee);
	}

	public void setEmployeeDAO(EmployeeDAO employeeDAO) {
		this.employeeDAO = employeeDAO;
	}

}
Step 12: Creating Controller Layer
Now create a spring mvc controller class which will have all the method we need for our CRUD operations.
package com.jwt.controller;

import java.io.IOException;
import java.util.List;

import javax.servlet.http.HttpServletRequest;

import org.jboss.logging.Logger;
import org.springframework.beans.factory.annotation.Autowired;
import org.springframework.stereotype.Controller;
import org.springframework.web.bind.annotation.ModelAttribute;
import org.springframework.web.bind.annotation.RequestMapping;
import org.springframework.web.bind.annotation.RequestMethod;
import org.springframework.web.servlet.ModelAndView;
import com.jwt.model.Employee;
import com.jwt.service.EmployeeService;

@Controller
public class EmployeeController {

	private static final Logger logger = Logger
			.getLogger(EmployeeController.class);

	public EmployeeController() {
		System.out.println("EmployeeController()");
	}

	@Autowired
	private EmployeeService employeeService;

	@RequestMapping(value = "/")
	public ModelAndView listEmployee(ModelAndView model) throws IOException {
		List<Employee> listEmployee = employeeService.getAllEmployees();
		model.addObject("listEmployee", listEmployee);
		model.setViewName("home");
		return model;
	}

	@RequestMapping(value = "/newEmployee", method = RequestMethod.GET)
	public ModelAndView newContact(ModelAndView model) {
		Employee employee = new Employee();
		model.addObject("employee", employee);
		model.setViewName("EmployeeForm");
		return model;
	}

	@RequestMapping(value = "/saveEmployee", method = RequestMethod.POST)
	public ModelAndView saveEmployee(@ModelAttribute Employee employee) {
		if (employee.getId() == 0) { // if employee id is 0 then creating the
			// employee other updating the employee
			employeeService.addEmployee(employee);
		} else {
			employeeService.updateEmployee(employee);
		}
		return new ModelAndView("redirect:/");
	}

	@RequestMapping(value = "/deleteEmployee", method = RequestMethod.GET)
	public ModelAndView deleteEmployee(HttpServletRequest request) {
		int employeeId = Integer.parseInt(request.getParameter("id"));
		employeeService.deleteEmployee(employeeId);
		return new ModelAndView("redirect:/");
	}

	@RequestMapping(value = "/editEmployee", method = RequestMethod.GET)
	public ModelAndView editContact(HttpServletRequest request) {
		int employeeId = Integer.parseInt(request.getParameter("id"));
		Employee employee = employeeService.getEmployee(employeeId);
		ModelAndView model = new ModelAndView("EmployeeForm");
		model.addObject("employee", employee);

		return model;
	}

}
In the above code we have used ModelAndView which will provide the views to be rendered. We are passing a string value to ModelAndView. Once passed Spring will try to resolve the exact view by "viewResolver" bean which we already defined in dispatcher servlet.
As string name provided is "EmployeeForm" Spring will look for jsp named EmployeeForm.jsp in "/WEB-INF/pages/” location.
Step 13: Creating Employee Listing Page (Home Page)
Create jsp file named home.jsp inside "src\main\webapp\WEB-INF\pages" directory of the project. home.jsp page displays the employee list as well as action links for creating new, editing and deleting an employee data. This JSP page uses JSTL and EL expressions.Containts of home.jsp page is given below.
<%@page contentType="text/html" pageEncoding="UTF-8"%>
<!DOCTYPE HTML PUBLIC "-//W3C//DTD HTML 4.01 Transitional//EN"
   "http://www.w3.org/TR/html4/loose.dtd">
<%@ taglib uri="http://java.sun.com/jsp/jstl/core" prefix="c"%>

<html>
<head>
<meta http-equiv="Content-Type" content="text/html; charset=UTF-8">
<title>Employee Management Screen</title>
</head>
<body>
	<div align="center">
		<h1>Employee List</h1>
		<h3>
			<a href="newEmployee">New Employee</a>
		</h3>
		<table border="1">

			<th>Name</th>
			<th>Email</th>
			<th>Address</th>
			<th>Telephone</th>
			<th>Action</th>

			<c:forEach var="employee" items="${listEmployee}">
				<tr>

					<td>${employee.name}</td>
					<td>${employee.email}</td>
					<td>${employee.address}</td>
					<td>${employee.telephone}</td>
					<td><a href="editEmployee?id=${employee.id}">Edit</a>
						     <a
						href="deleteEmployee?id=${employee.id}">Delete</a></td>

				</tr>
			</c:forEach>
		</table>
	</div>
</body>
</html>
Step 14: Creating Employee Forms Page
Create jsp file named EmployeeForm.jsp inside "src\main\webapp\WEB-INF\pages" directory of the project. EmployeeForm.jsp displays details of a employee for creating new or updating old one.
<%@ page language="java" contentType="text/html; charset=UTF-8"
    pageEncoding="UTF-8"%>
<%@ taglib prefix="form" uri="http://www.springframework.org/tags/form"%>
<!DOCTYPE html PUBLIC "-//W3C//DTD HTML 4.01 Transitional//EN"
    "http://www.w3.org/TR/html4/loose.dtd">
<html>
<head>
<meta http-equiv="Content-Type" content="text/html; charset=UTF-8">
<title>New/Edit Contact</title>
</head>
<body>
    <div align="center">
        <h1>New/Edit Employee</h1>
        <form:form action="saveEmployee" method="post" modelAttribute="employee">
        <table>
            <form:hidden path="id"/>
            <tr>
                <td>Name:</td>
                <td><form:input path="name" /></td>
            </tr>
            <tr>
                <td>Email:</td>
                <td><form:input path="email" /></td>
            </tr>
            <tr>
                <td>Address:</td>
                <td><form:input path="address" /></td>
            </tr>
            <tr>
                <td>Telephone:</td>
                <td><form:input path="telephone" /></td>
            </tr>
            <tr>
                <td colspan="2" align="center"><input type="submit" value="Save"></td>
            </tr>
        </table>
        </form:form>
    </div>
</body>
</html>
Output:
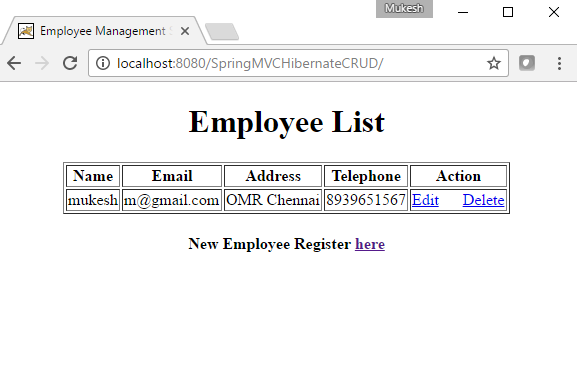
Now lets hit http://localhost:8080/SpringMVCHibernateCRUD/ URL to get initial screen which is shown below.
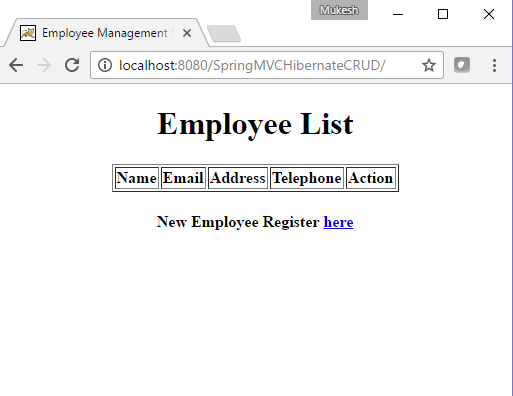
New Employee can register by clicking on Registraion link. Registration page is shown below.
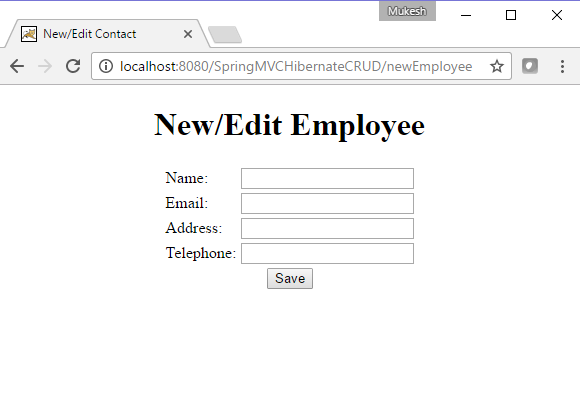
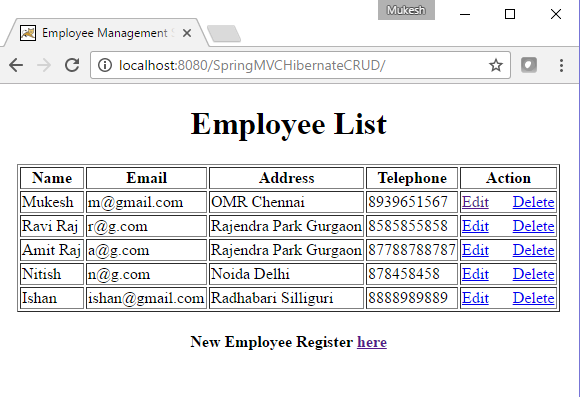
Fill the details and click on Submit button, once record is submitted it will store in DB and user will navigate to below screen.
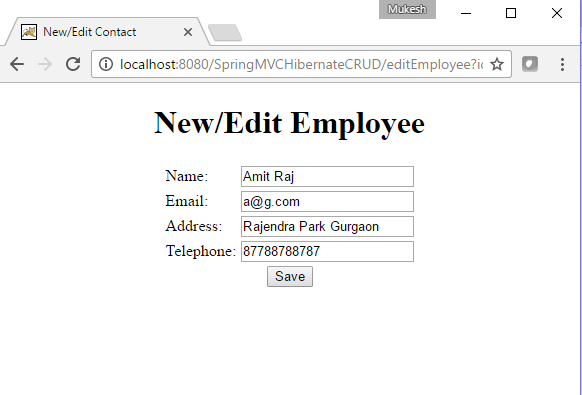
Edit Screen
Once user clicks on Delete button employee data will be deleted from database.
We are done with Spring MVC hibernate MySQL CRUD example. If you are still facing any issue, please comment.
Download this example(src+lib) developed in eclipse
References:- Spring MVC Documentation
Related Articles

